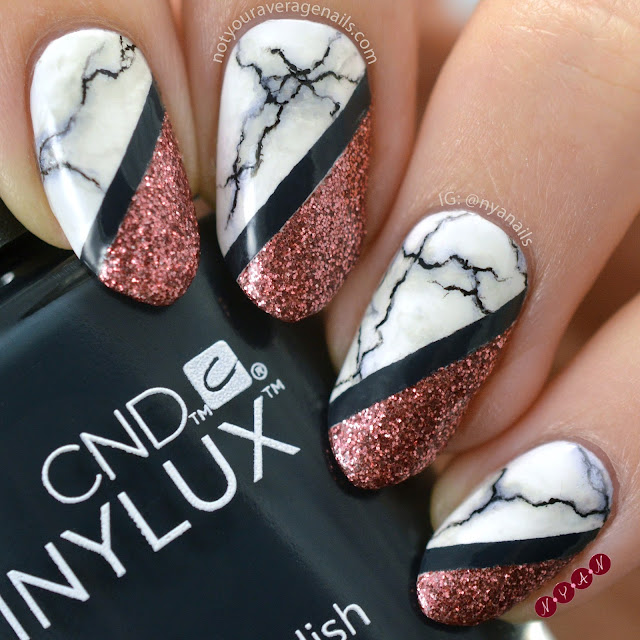
It's been way too long since I last did marble nails!
I tried a bit of a new technique for this design by mixing together a few different methods I've seen for painting marble nails.
I've tried a bunch of different marble techniques in the past to try to get the most realistic marble print possible. I've tried cling-wrap marbling, I've tried building up with various shades of grey polish, and I've tried @ninanailedit's Sharpie technique.
This time around I started off on the thumb with straight Sharpie/Rubbing Alcohol, but it was too blue for my liking so I tried to find a way to fix it. This is the technique I settled on:
1. Take a small bit of light grey polish on a nail art brush
2. Quickly dip the brush into acetone
3. Quickly paint the thinned out grey polish onto the nail
4. Repeat with white polish and darker grey polish
5. Use a clean brush dipped in acetone to blend the colours together around the edges so you don't have any harsh lines
6. Paint thin, craggy, dark grey lines and then paint over most of them with black
7. Add that Sharpie/Rubbing Alcohol mixture around the black lines, generally focusing on where lines converge
I think this has been my favourite attempt at marble nails so far, so I think this is a technique I'll come back to in the future!
I'm also really happy with how the marble looked with the rose glitter (still one of my favourites) and the dark blue line separating them. Definitely never wanted to take this design off of my nails!
Products Used:
Butter London - Rosie Lee
CND - Clear Top Coat
CND - Indigo Frock
Essie - Grow Stronger Base Coat
Essie - Licorice
Sally Hansen - Eel Skin
Sally Hansen - Seize the Gray
Sally Hansen - White On
Black Sharpie
Rubbing Alcohol
xo,
Becca.


Wow! It looks so real! Beautiful ♥
ReplyDeleteThank you!! <3
Delete